Mixars Primo Serato DJ Controller Review
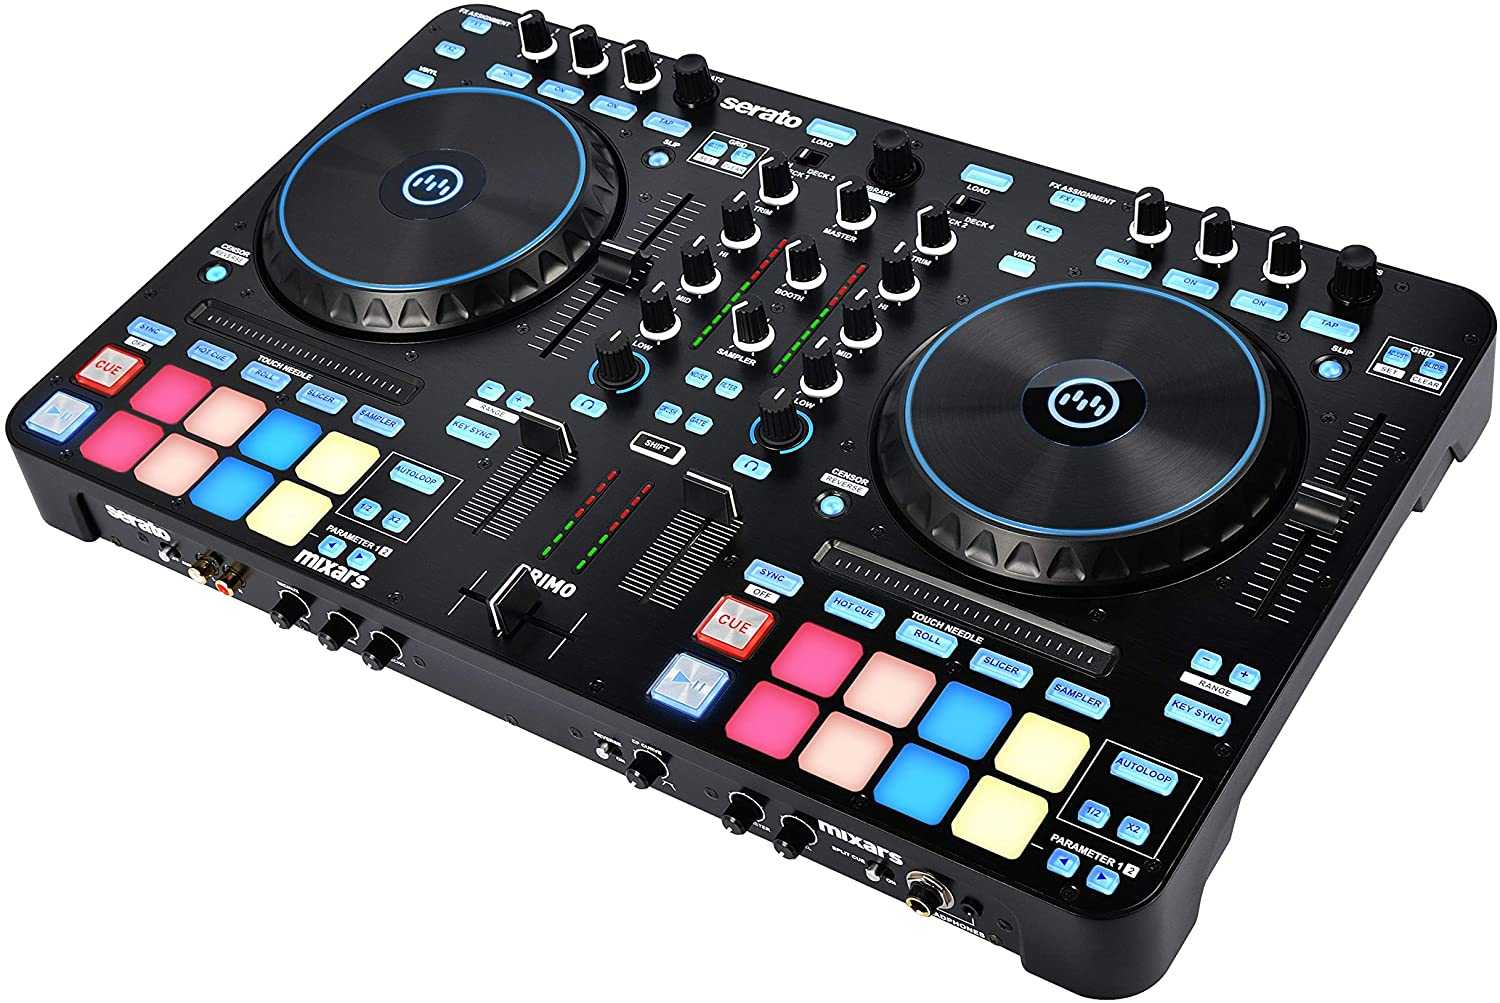
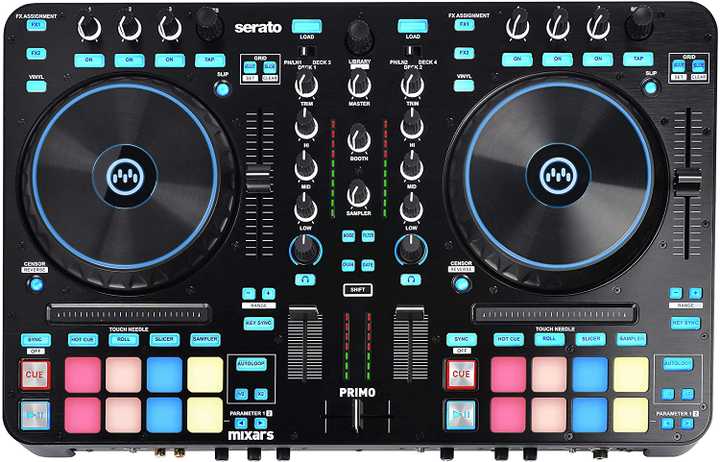
This is a detailed review of the brand new Mixar Primo, 2 Channel Serrano deejay controller. So Mixars have been coming out with really cool deejay gear for the last four or five years and they produced really good deejay mixers really high-quality stuff. They also have really high-quality turntables.
But this is the new Mixars Primo. This is the newest deejay controller or deejay product that Mixar’s has out right now. They’ve been teasing this thing since about two years ago.
I think NAM 2017 we first heard about it but we haven’t heard anything since, it’s finally released a few months ago and now we have our hands on the mixer here the final edition and we’re going to review this, show you everything that this mixer or deejay controller has to offer.
FEATURES
- 2 Channel Controller for SERATO® DJ
- Performance Pads with Hot Cues, Roll, Slicer, Sampler
- Sturdy build quality with Brushed aluminum faceplate
- Built-in sound card for simple USB connectivity
- 100mm Pitch Control
- USB powered
- SPECIFICATION
- Pro Combo Mic input with independent Volume, Tone control, and Echo
- Large aluminum Jog wheels with On-Jog Display and LED Ring
- 16 RGB Performance Pads
- 3 VU-level meter
- Crossfader curve adjustment & reverse
- Auxiliary RCA Input with dedicated volume
- Touch Needle search strip
- Multiple inputs and outputs
- High-quality audio Soundcard
- Two headphone outs
- Plug and Play with SERATO DJ
BUILD QUALITY
First, we are going to touch on the build quality and mostly all of Mixar’s gear. This is a mostly metal body, the top face is all metal. You have a metal back panel where all your connections are and then you also have a metal front panel as well.
There is some plastic along the sides and the bottom of the unit there are also cutouts in the bottom so that we can grab it, but everything feels really solid, well built, and really well made.
You have metal top jog wheels you have really nice rubberized pads and your faders don’t feel really cheap or plastic everything feels really solid really sturdy like it’s definitely built to last. Like all other mixers products.
Setup
The setup for this controller is pretty easy as well if you have a Windows or Mac you’ll have to go to the website and download your latest drivers and firmware, make sure you have this up to date, and then you’ll have to go to Serato deejays website in order to download the latest Serato deejay software put that on your computer and you’ll be ready to play with the Mixar’s Primo.
I also had to do one more funny thing that I never had to do with any other controller ever before and that is calibrating the jog wheels.
Jog Wheel calibration
When I first did the setup procedure, I had the latest firmware on there the latest drivers and the latest Serrano deejay software. But for some reason every time I hit play and I started to touch the jog wheel, for some reason the music would just stop.
So I had to contact Mixar’s company and they actually told me that we need to do a jog wheel calibration, for some units.
So right out of the box brand new, I had to do a jog wheel calibration first. It’s a really simple process where you have to turn the power on while pushing a few other keys and don’t press anything on the Jog wheel and it will automatically sense where it is. And that’s all it took.
Once that was done the unit worked really well and everything worked just as it should.
How to do Jog Wheel Calibration?
1.Make sure your Mixar Primo is switched off via the power switch at the back.
2.Press and hold the buttons NOISE + FILTER, then switch on your device, using the power switch at the back while holding the Buttons.
3.Press the left deck VINYL button to switch between auto-calibration and manual calibration. The VINYL button LED will show the current calibration mode:
a.VINYL Button LED ON: Currently in auto-calibration
b.VINYL Button LED OFF: Currently in manual calibration mode
Auto Calibration:
1.The 2 Jog wheels are calibrated together.
2.Do not touch JOG WHEELS during the calibration
3.Press SHIFT to save the parameter. Calibration is done.
Manual Calibration:
1.The 2 Jog wheels are calibrated separately. The jog wheel touch should be calibrated one by one.
2.Move the pitch fader of the side under calibration. Jog wheel sensitivity increase from the minimum to maximum when moving the pitch fader from bottom to top. The jog wheel LED ring will show the current sensitivity settings.
3.Touch the jog wheel touch area to test the sensitivity. The logo at the middle of the jog will turn on when a touch is sensed.
4.Adjust the pitch slider to set the desired touch sensitivity. It is recommended to touch the jog wheel and spin the jog wheel to make sure the touch is detected properly (the logo LED keeps turning on during the spin).
5.Repeat the same for the other deck.
6.When the calibration is done for both decks, press SHIFT to save the parameter. Calibration is done.
INPUT/OUTPUT
BACK CONNECTIONS
First up we’ll take a look at all of the inputs and outputs. We have your master XLR, you also have your booth TRS and you also have a master RCA connection as well. Then you have your 2-channel inputs channel 1, and channel 2, both are RCA and you can switch either one to Line or the Phono using the small switches on the back.
Then you also have your microphone input on the back which is a combo jack either XLR or Quarter inch. Then you have your USB port, you have your power button, a nice clicky power button, and then your DC-in for your power supply.
FRONT CONNECTIONS
On the front, you have your Mike, Off, AUX switch so that way you can use the controls on the front either to use your mike input or your auxiliary input. Your auxiliary RCA input is found on the front.
It’s perfect for when DJs are doing gigs and you want to maybe use phone music or another source of your audio so you can just plug it in that way you’ll be able to play and it’s also good to have it as a backup because you don’t need this to be working or using in Serato deejay in order to use your auxiliary ports on the front so that’s definitely a huge plus.
You also have your microphone and AUX volume knob your Tone volume knob and then you have your mike echo knob as well. So that way you can put an echo onto your microphone up in the front. You also have your cross Fader reverse On/Off, your cross Fader curve knob and you have your Cue master knob in the front. You also have your headphone jacks, quarter-inch, and your mini. You have your split cue on-off button and of course the level knob for your headphones.
Front panel
So we checked out everything on the panels now we are gonna take this controller plug it in and show you all the other controls that we have on the Mixar Primo.
The new Mixars Primo, 2-channel Serrato DJ controller is actually 4-Channel capable because you have deck 3 and deck 4 layered in with the switches at the top right. On deck 1 you can switch that over to deck 3 with the switch, On deck 2 you can switch that over to deck 4 also with the switch.
It’s usually easier to DJ on controllers with a full 4 decks of range instead of layered within. If you really want a deejay using four decks this is more a 2-channel style deejay controller in my opinion and it works the best when used in that 2 channel configuration.
On the upfront panels, we already showed you all of the input and output options. You have your headphone output all the way to the right, one thing to note about this headphone output is that it’s very strong, it’s very loud and it’s gonna work well when you’re in those really loud deejay environments where you need to monitor and be by yourself with your sound.
This is definitely going to do it for you because it’s very loud.
You have your Split CUE option so you can monitor in your headphones and then on the front, you also have the knobs for your fade button to use when you’re queuing up in the headphones or what’s coming out of the master with the master control volume knob.
CROSS FADERS
The crossfaders on the bottom feel pretty good but the feel is kind of deceptive because this has a rather long 5 mm cut in the distance. You can really move the fader quite a bit before you actually hear the sound cut out.
We are on the hardest curve setting meaning is the sharpest curve setting that we have and it’s still a really big dead space in there. Long cut-in distance is a no-no for Cross Fader so it kind of makes it a little bit useless when doing most of your super hard cuts.
But again deejay controllers are not really where you’re going to lay down your huge crazy sets when you’re talking about turntable-ism. You’ve got to take it for what it is. This controller doesn’t have one of the better crossfaders on most controllers out there.
LINE FADERS
You have your line faders they are much stiffer and they work just as they should. Your shift button is in the middle. The shift gives a lot of your other secondary functions to some of the primary functions on some of your buttons.
Anything that has a white annotation below it (a white box) means you can press the shift key and do something else with that same button.
EFFECTS
You have your effects that are in the middle. These are kind of like your sound color effects. You have noise, filter, echo, and crush. They all work really nicely and they’re all post-fader effects as well. You also have your low, mid, and high EQ for each of your 2 channels.
You have your sampler volume knob in the middle. You also have your booth volume knob above that and then you’re master volume knob with this bright blue color on it all the way above that.
BROWSE LIBRARY
Next, you have your load functions and your browse and library oversized knobs, nice and rubberized and nice and clicky so you know exactly where you are within your library.
You can press shift and the knob and then you’ll be able to go back and forth through all of your different folders and files or your different playlists in order to select the playlist that you’re trying to use.
You can click load and you’ll be able to load the track that you have in question the track that you want to use at that particular time. When you load it you see the outer ring on the jog wheel kind of load up or queue up the track.
FX1 AND FX2
Next, you have your FX1 and FX2 that are at the top of your controllers. This is like the traditional three different controls for your effects.
Then you have your beat knob all the way to the side so you can select all the different effects that you have with a Serato deejay and any one of your effects modules and you can enact them on deck depending on how you select these knobs here. That way you can select whatever deck you want.
You can use your multi-effects within Serrano DJ or your single effects where you can use these buttons or knobs to change different parameters of the effects.
So full-featured FX at the top for all of Serato DJ effects and yes they are post cross Fader and post line Fader as well.
Grid, Adjust, Slide
Next, you have your grid adjust and slide buttons. These are used to set your different grids within the Serrano deejay software of your track.
You have a slip button and you can also use this to change the pitch range by pressing shift and slip. You also have your nice long oversized pitch slider.
This tempo slider has caused some issues with some people in the forums that I’ve seen but I haven’t had any issues with the pitch slider.
One of my minor gripes with the pitch slider is that around the zero point there is no change in the BPM or in the percent but there is a center click there as well.
I would have liked to see a darker line at the center zero areas because when I was doing my manual beatmatching I like to kind of use that as a reference point for each one of my decks so I know exactly how much I am over or under the zero.
So that was a little bit confusing but you can always slide it back to that middle click area to where the zero is at.
Pitch Bend
Next, you have your pitch bend buttons. You also have your key lock button and you’re familiar Autoloop section that you see in the picture. This is what is similarly found on most Pioneer DJ equipment.
You have your Autoloop. You can have the loop and you also have parameter buttons that correspond to your different pads. You also have a Vinyl button so that way you can use this in Vinyl mode.
Or you can use it in jog wheel mode meaning that you can just fast forward or slow down the track that’s currently playing but it won’t actually grab and bend and scratched the music.
The jog wheels themselves are pretty good to use but they do have rather stiff tension to them. And I really wish they had a lot less tension to them and there are a lot more slippery because if I do a spin back the most is gonna spin back as maybe 2 or 3 turns.
When you do the spinbacks with CDJ or something else that has a lot lighter of a feel you get good tense spinbacks on one rotation I can’t do that here in Mixars Controller and I really wish the jog wheel were a lot looser than they are now.
It’s tighter which means for me it’s more geared towards using this for mixing as opposed to scratching but they are very accurate so you’re gonna get all the right sounds and you’re supposed to get.
At the same time, I wish the jog wheels were a little looser so that way I can get my accurate spin backs and more accuracy with jog wheels. It just feels more true to vinyl when it has less tension.
To go along with the jog wheel the only time that you actually see a needle indicator on a jog wheel is when you’re at the second ending mark of your track. For some reason, that’s just how it works.
So I don’t know if that’s gonna be a firmware update that they produce one way or another but I would like to see that needle indicator working throughout the whole track and not just for the final 20 seconds of the track.
TOUCH NEEDLE STRIP
Next, you have your touch needle strip. This will allow you to skip forward or backward within the track. You also have your Censor/Reverse button.
This will allow you to momentarily slip or Censor any other part of the song you want to, just for a brief second, while you’re holding it down or we press shift and censor the whole track we’ll continue to play in reverse.
Play/Pause, Cue buttons
These are like hard plastic but they feel like they have like brushed aluminum kind of paint on them. Very responsive. They feel really responsive and they feel good even though they’re pretty small.
Here you have your Sync on and off button and then you have your notorious pad modes within Serrano DJ. You have HOT CUE, ROLL, SLICER, SAMPLER, and of course my favorite pitch play so you have all of the functions that you need.
They’re very responsive rubberized pads they don’t have a click to them but they do have a good amount of giving to them so they feel really good to drum and play with.
CONCLUSION
So, in conclusion, the new Mixars Primo, 2-channel Serrano deejay controller is a pretty good controller overall it’s good for Serato DJ, if you’re Serato deejay user there’s not too much else for you guys to choose from for the 2-channel market that is current today you had the DDJ SR2 which I think I like a little bit better than this unit.
But the thing is that this does have to go for it is that it has really good construction has a metal top on the front on the top and on the back. So you’ve got a really solid build quality here.
You also get a nice compact footprint it’s really easy to take with you on the go you probably still want to invest in a small bag and or the deck saver cover so that way everything’s protected when you do buy this and you’re gonna take this with you out on the go.
But the compact size is very ideal for you to store it and also for you to fit in those cramped deejay booths and also just to take with you on the go it’s much easier than when you’re using a bigger 4 channel deejay controller.
It also comes bundled with the full-out Serato deejay pro software and it also has all of the cool pad modes that you come to love including the pitch play the hot cue and all of the roll the slices and everything else you guys would want on the pads and the pads are very nice and they work very well for finger drumming and for all of the other performance functions that you’re gonna do with them.
The other excellent thing about the Mixars Primo is that it comes with a standalone mixer mode meaning you can use this without attaching it to your computer, all of the sound color style effects in the middle will work with any device you have plugged into either of the channels and the two channels are Serrano DVS deejay compatible meaning you can use your time code controls for the inputs on the back of the unit all you need to do is upgrade to that Serato DVS kit.
DOWNSIDES
On the downside, I really thought that the lag on the cross Fader was very long. It’s much more than what I find on other deejay mixers. I’ll have to check with the guys over at ENO Fader to see if you can plug it in a fader here.
But as it stands the fader that’s here really is a very long cut in the distance making it very hard for you to scratch with using the Mixar Primo.
The jog wheels also have way too much tension for my liking. I like them to be a lot looser than this a lot more scratchy, a lot looser so that way you can do more scratching and more spinbacks at a longer rate than what you can do here on the Mixars Primo.
Another downside is that didn’t like the fact that I had to actually set up the pressure sensitivity or the touch sensitivity of the jog wheels right out of the box.
Let us know in the comments if your unit had to do the same thing with it but this was one of the first deejay controllers that I ever had to calibrate the jog wheels right out of the box so that way it would start working.
All in all, it’s still a pretty cool controller for Serato deejay. It’s nice and compact it’s very well-made and it will definitely suit the bill for you guys out there that don’t care about having a real slippery-style jog wheel or don’t care about the longer cut-in distance of the fader. So for those mixing deejays, this might be the perfect Serato deejay solution for them.

