Numark NS7III Detailed Review
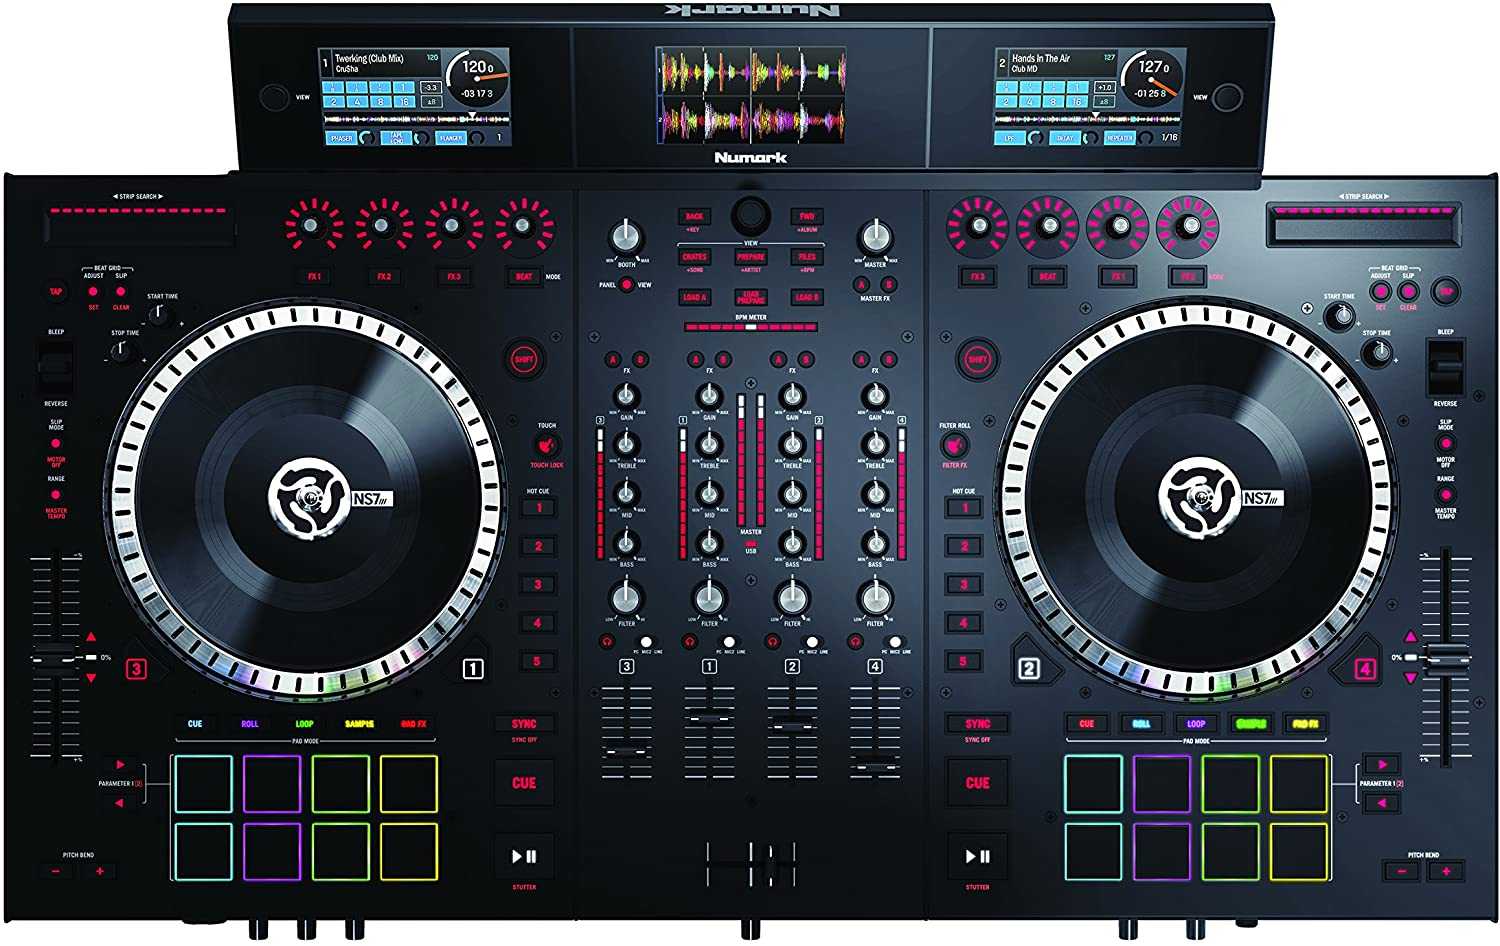
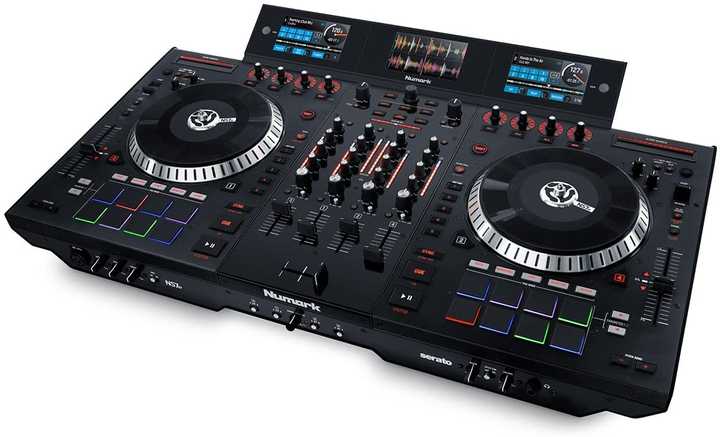
This post is a detailed review of the Numark NS7III Professional DJ controller. If this looks familiar to you, it really should because it’s almost the same controller as the previously released Numark NS7 II except you’ll notice they have 3 beautiful screens mounted to the top region.
Dimensions: 29.7″ x 18.2″ x 4.8″ | Weight: 31.57 lbs | Channels: 4-channel | Software: Serato DJ | Skill Level: Advanced | Price: $1200
Essential cables you need to set up the controller:
- Numark Pro Gooseneck Light
- Monoprice 1.5ft Premium 2 RCA Plug
- Premium USB 2.0 Cable
- C2G Replacement Power Cable
- Phonograph Turntable Ground Wire
- Numark RS45TFS Replacement FaderStart Crossfader
The screens on the NS7III are in order to give you guys a nice view and look at the Serato DJ software the different wave points cue points and all types of other information such as your library and track information.
That way you don’t have to look at your library screen or your computer laptop screen as much as you normally would.
So these screens are here to assist you in basically focusing on your main performance and they also are offered as an add-on to the new mark and NS7II.
ADD-ON SCREENS
If you guys have a Numark NS7II right now and you’re looking at this like, man I wish I bought the NS7III, you don’t really have to fear anything because they do offer the screens as a separate add-on for the NS7 2.
DIFFERENCES
So there are a few other differences besides that, they do have the same form factor but the NS7 3 was able to shave 1.5 pounds from the original weight of the NS7 2 and that is even with the screens attached.
So they used a few different materials in the workmanship but it’s still completely solid, it’s metal all the way around, and it really gives you the confidence that you’re using and working with a really professional digital DJ controller.
It’s really sturdy really tough but again it’s lighter. They also have these blackened Akai MPC pads that are used to control things like cue points, rolls, loops, samplers, and your slicers.
It’s really really nice to the touch it’s exactly the same path as the NS7 2 but in NS7 2, of course, they’re gray instead of black.
AUDIO CIRCUITRY
Another one of the differences that they have with the NS7 2 and NS7 3 is that they have changed the internal audio circuitry so you have slightly better sound quality with the NS7 3 than you do with NS7 2.
Unfortunately, I don’t have an NS7II to compare them side-by-side so I don’t know exactly what was the difference in the sound structure. But they both sound very superb and they’re both definitely high-quality audio coming out of both.
CLASS-COMPLIANT
They also are now completely class-compliant with Mac machines so that way you don’t have to go and get an additional driver for a Mac.
Windows users still have to go get that driver as always of course but the new NS7 3 is now class compliant so with the Mac you just plug it and you play and you’re ready to go.
You also have the new addition of allowing this to be a Serato DVS-capable machine meaning you can actually plug external turntables into the inputs on the back of this device.
As long as you purchase the Serato DVS expansion pack you’ll be able to use this with your external turntables and timecode you’ll be able to use these screens in order to see the different decks as well. So you have a really strong real sturdy style controller just as with the Numark NS7 2.
Related to the NS7 3 the main difference between these two controllers again is the addition of the screen so that’s what we’re going to focus on here in this review.
Front I/O Ports
So let’s take a closer look at the inputs and outputs, then we’ll take a closer look at all of the different functions that are here and especially a deep dive into what’s on those screens.
On the front left side of the Numark NS7 3, you have your MIC control and your combo Mic input for microphone Nr1. It accepts both XLR and TRS. You have a gain control, base control a treble control and you also have your mic on/off switch.
Moving along to the middle of the controller you guys will see they have the A/B switches, so that way you can either add your different line inputs or your lines to side A of the crossfader or side B of the crossfader.
This way you can change and hampster any of the different channels you want to. You also have a crossfader contour control knob which changes the curve of the crossfader.
It’s a really nice loose crossfader perfect for scratching and also perfect for blending. Very professional, it feels like there’s a lot of metal inside of there feels like a really good crossfader overall.
All the way to the right of the controller you will see the controls and the options for your headphone inputs or your headphone outputs.
The outputs of the headphones are both mini and you have a quarter-inch you also have a volume control knob which is also a blend control here so you can change between master or you have already a cue section for your mix. You also have a split cue on/off knob or button there as well.
Back I/O Ports
So in the back, we have your inputs and outputs along with your screen attachments.
All the way to the left you have the option to make the motors either low or high torque. You also have your phono grounds here so that way you can plug in your turntables and you can eliminate the hum by grounding them correctly.
You have a microphone 2 input which is also a combination just like the ones on the front and that is a TRS and XLR combo.
You have four different line inputs for all 4 of your lines, that way you can use this as a completely standalone mixer and you also have 2 of them, number 2 and 1 which can double as using phono decks.
So they can be line or phone offset that way you can use your turntables that don’t have a preamp with them.
If we move right along you guys will see we have the screen attachment and the screen simply just slaps right in from the top.
It has an additional dongle cable so that way you can have your power connected directly to the screen and you also have your USB connected directly to the screen. You also have another USB in so that makes another USB port for you and then you attach the PC USB.
Moving along to the right of the mixer, you will see the different outputs. We have your balanced master left and right XLR output your master RCA output and of course, your booth RCA output along with your power cable and you’re on/off toggle switch.
So the Numark NS7 3 DJ controller is the newest iteration of the Numark and S7 lineup. This is very similar to the Numark NS6 2.
We’re just going to really focus on maybe some of the main features and then we’re going to go over to the screens and show you exactly what the screens are gonna add for you.
4-Channel DJ Mixer
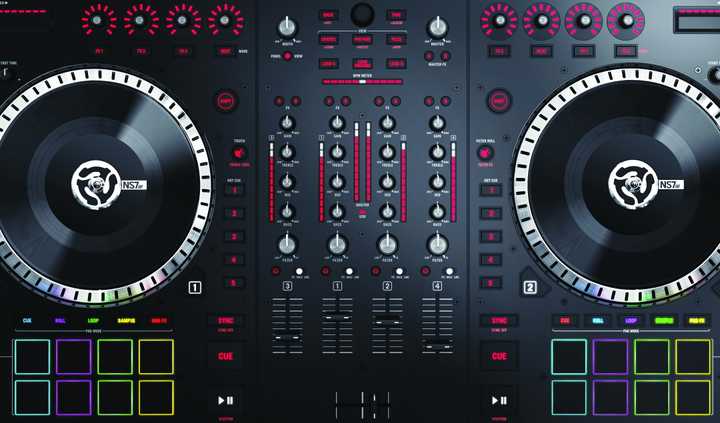
You have a 4-channel DJ mixer, you have your inputs on the back that you were able to see earlier so you have a full standalone real 4-channel DJ mixer here.
Crossfader
Crossfader in the front, a very nice crossfader as we mentioned earlier when we talked about the different functions on the front that controls the crossfader.
Such as the reverse functions and also the barring that the crossfader has on your different channels and the contour control in the front as well.
For each of your channels, you have different selections so that way you can make them the actual inputs on the back. You can change them to PC in order to actually pick the cerrado DJ as the input of choice.
You can change them to microphone 2 which you had on the back of the controller so that way you can control your different EQ on the microphone you can also pass through different effects and so on and so forth with the microphones through any of the channels that you choose to pass it through.
You also have your Hardware filters, they’re low and high-pass filters they do not work with your inputs on the rear but they do work with all of your Serato DJ digital files.
You have Bass Mid and Treble knobs, upfront along with gain for each of your channels. You have full LED strip meters so that way you can see exactly where your volume is in the mix.
You have your FX on/off buttons for each of your channels for FX section A or FX section B.
You also have a BPM meter which allows you to see if both of your different tracks are in time so that way you can tell at a glance if both of your tracks are actually in sync or not.
Then you have your browse section, so that way you can go through all of your files and folder that you have listed within Serato DJ and you can see them on the screens up top will touch on the screens a little bit in a second.
You also have a master FX section where you can enact your FX bank A or Bank B onto your entire master.
You have your master control volume knob and you also have your booth control volume knob as well.
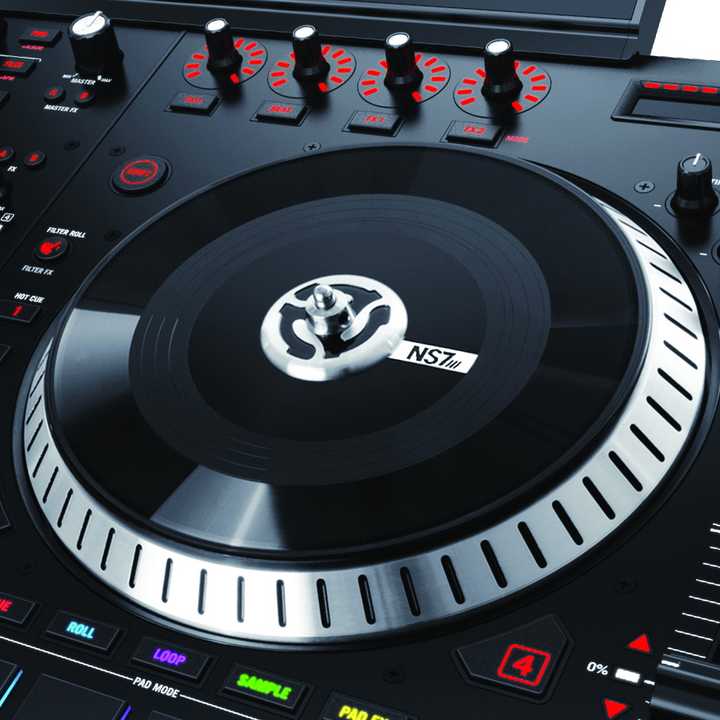
For each one of your decks, you have the actively spinning platter with a real piece of vinyl and a real actual piece of felt mat underneath for your slip mat duties. This will work for both deck 2 and deck 4. You can press the buttons in order to change which deck you’re using and deck 1 and 3.
On the left side, you have your play/pause. Your cue button and your sync buttons. Nice rubberized pad feels to them.
You have a really really nice responsive high torque direct drive motor right here where you can control the start time and the stop time off in order to do different effects with your vinyl braking and so on and so forth.
So responsive, you also have a belief in reverse function so that way you can allow the track to bleep and spin in Reverse for a short amount of time or you can make it spin in Reverse permanently.
You also have a slip mode motor off function so that way your motor will remain off whenever you’re using the actual deck it will instead of being in scratch control mode. You’ll now be in jog wheel mode so that way you can pitch Bend and use them that way.
But you always are going to want these and actively spinning mode that’s why you buy the NS7 brand and that’s what they’re here for.
You have your long really sturdy feeling pitch slider with a center light that comes on. Is not a sender click here so you’ll be able to use the entire frequency bands for your tempo control.
You also have these gorgeous MPC Akai pads they get exactly the same ones for the Numark NS7 2 but here you’ll notice that they’re black instead of grey.
They control your cues your auto loops and your auto rolls loops. You also have a sampler here and your slicer you can go check out all those functions and features within the Newmark NS7 2.
I notice while you have your hot cues here you still have your hot cues listed here alongside the deck as well. So that way you can use your hot cues from here while at the same time you’re using any of your other features as well.
Again you have your RGB backlit pads here underneath the blackened area so that way you can look at a glance and tell each one of your hot cues which one is which because they’ll correspond to exactly what you have on the screen.
Also here you guys will notice there’s a strip search function so that way you can jump in between anywhere of your whole track really really quickly by using the strip search all the way at the top.
NS7 3 Big Screens
So now let’s take a really close look at those screens.
So the really big story on the Numark NS7 3 is the big screen mounted to the top of the controller. This screen will allow you guys to see a lot of the different functions and features within Serato DJ without actually having to look at your laptop.
So the middle screen is actually for your file navigation. The controller actually only had two screens and that was kind of a hindrance because we wanted a third screen in the middle in order to show our different files and different tracks.
So that way we can navigate through our library and actually select tracks a little bit easier than taking up the screens that were actually used for the decks. As shown in the pic you guys can see the three screens.
The middle screen is more dedicated to your library navigation functions while the screens on the sides are more dedicated to your deck functions.
Of course, you can press a view button and you will actually change the view of the middle screen to a horizontal waveform so that way you can see a side-by-side waveform of your two tracks.
When you press it again you come back up to the navigation of your files and your different tracks.
You can press back and forward and go all the way through your crates through your prepares and your files and that way you can go through the navigation of your files pretty easily.
DOWNSIDES OF THE SCREENS
On the downside of the screen for navigation, there are times where are you in a gig and you may actually want to use the keyboard in order to access or search for your different files or your different music and you’re not able to do that here on the screen.
You’ll actually have to take out your laptop once again in order to type that entry in and load that track onto your deck.
It’s not all perfect in that regard but if you do really organize your music in the right way for your gig you will be able to use just one or two different screens or a few different playlists or crates that you guys can access your music from.
And then you wouldn’t be able to use or have to use your laptop at all.
The screen actually shows you the different tracks that you’re selecting. It shows you your BPM and you can also have these in order by Artist by BPM or by track name as well.
Again when you press that view button on either side it changes it to the second view that you see with the horizontal waveforms.
They’ll be stacked one on top of the other that way you can see them easier for things like doubles and tricks and things of that nature.
For the different track decks that you have on the side track screens, you’ll notice you get to see a long timeline at the top which shows you exactly where you are within the track.
It also shows you your cue points and those cue points are colored to match the colors of the pads that you guys have on the controller.
You also have a big waveform, a big view of the waveform, and also the track information and it also shows you where you are within your loop roll timing.
Below that you’ll see they have the different controls for your EQ as you can see at a glance which EQ is enacted or you can see which EQ level where that is at and you have that on both sides as well.
And then when you press the view button again you get a needle indicator so you can see where the needle of your track is.
You can also see exactly what the different loop is that you have set up or the different functions that you have set up on your slices or your sampler pads whatever that is corresponding to at the time.
You also get to see your track name and your artist name as well. You also can see the different key and BPM information for the track also.
SUMMARY
So all in all the screens are a really really cool and good function and a good addition to the Newmark NS7 III. It definitely allowed me to take my attention away from the laptop and focus it on the controller during the performance.
CONCLUSION
So, in conclusion, the Numark NS7 III DJ controller is definitely by far my new favorite digital leader controller of them all.
The reason being is that it has these actively spinning platters which really harken back to my original vinyl DJ waves and they also had these new gorgeous three screens built right in at the top.
So that way you can see all your information your waveforms your cue points and all of your file navigation need right here onboard the unit without actually having to glance and look back at your laptop.
You also have this super sturdy and very strong durable quality build all the way around just like with the original NS7 1, and NS7 2.
It also comes bundled with the full Serato DJ experience so that way you’re getting all the software that you need to operate the Numark NS7 3 right out of the box.
You also have the ultra-high torque actively spinning platters with real vinyl on top of it and slip mats underneath that and actively spinning platters underneath that so you can’t really get any closer to vinyl DJing than this.
Or if you actually have vinyl that’s the only way you’re gonna get anywhere near as close on a DJ controller to the Numark NS7 III.
You also have the authentic Akai Pro 16 performance pads which feel really good to drum with really nice and are easy to use.
They also have the RGB backlit ring underneath so that way you can just see at a glance exactly what all your cue points are for and it corresponds to exactly what you’re looking at on the screens within the Serrano DJ experience.
You also have the touch-sensitive EQ and effects controls which are very very fun to use very easy to manipulate and fun to just press down or touch down on a control and for it to react exactly how you wanted to by knocking in effect or by simply cutting out different EQ bands so the one that you place.
It also has a stand-alone mixer with an assignable microphone so that way you’re getting a really good high-quality mic experience for those who are using this in a digital DJ mobile DJ experience.
It also has the capability to use Serato DVS compatibility meaning you can add two additional turntables to the ends of this if you really wanted to. You can have Serrano DVS noise map or time code style control.
DOWNSIDES
On the downside, it’s still a big heavy bulky unit so it’s really big and huge so you’re gonna have to lug this around with you but the users of this unit they’re probably people coming from turntables which are a much bigger footprint and even heavier than this to carry and you would need two of them plus a mixer so again it is pretty bulky and heavy.
But the people who are going to use this would normally probably have a bulkier setup than even this.
They also have low high-pass filters that only work with your digital software needs they will not work with your external inputs and others.
A small downside to this is that you still will probably need your laptop from time to time. Because if you want to go and search and look for different tracks within your library.
There’s nothing better than a keyboard and there are also a few other things that you can’t see on the screens of the NS7 III, that you can when you’re looking at a computer such as when we touch the different EQ knobs in order to kill the different parts of the spectrum.
The waveforms on the actual screen actually show you a visual indicator on that waveform that you killed in different spectrums of the EQ whereas you don’t see that on the screens here on Serano DJ.
Even with those minor gripes, it’s still the most fun that I’ve ever had on a DJ controller. The screens are an excellent addition to the already proven tried-and-true Newmark NS7 2.
